Showing posts with label Cricut. Show all posts

Jul 13, 2016

my "But for the Grace of God" bench - Home Decor


Quite a few years ago, my eldest son 
(with a wee bit of help from my carpenter husband) 
made me a lovely bench for Christmas.

He left it unfinished so I could 
paint it to match where ever I 
wanted to use it...so sweet.


It's a beautiful bench, buttery smooth
and I debated whether to just leave it
as is.

Then I was inspired...

Keith Urban 2016
by a Keith Urban song, 
It was a #1 hit back in 2001
but it's one of my favorites
from him.


I originally used my Cricut to 
cut out a stencil but had major
issues with placement and paint
getting underneath it...what a mess.

So I pretty much free-handed it.
Sketching the letters with pencil,
painting with acrylic then using a 
sharpie marker to even out where 
my hand was unsteady. whew!


Determination always succeeds!


Hope you're having a great day.
Blessings!


scroll down to see where I'll be sharing today's post.

Jul 8, 2016

A Doodlebug Onesie for Baby - Cricut Craftroom


Welcome to Baby Card Central!
the series continues...


I'm stilling using my Doodlebug Design papers,
they are so sweet! 

Cricut Craft Room basics, Cricut, Memento ink,
Doodlebug Designs paper (Snips & Snails),
kraft paper, button, baker's twine, SU! Congrats sentiment


The Cricut Craftroom offers some 
basic cuts and this is one of my 
favorites for baby making baby 
card making! (:


So many babies, so little time.
I believe I have two more cards
to share; another boy & a girl card
finally. Stay tuned.

More baby card inspiration...


Thanks so much for stopping by.
Have a blessed Thursday!


scroll down to see where I'll be sharing today's post.

Jul 5, 2016

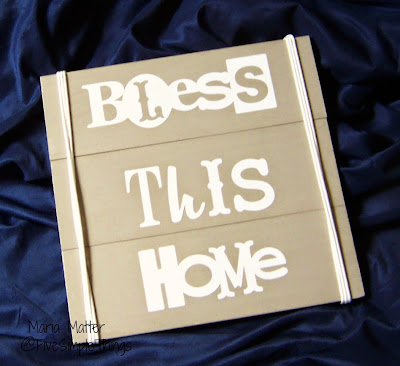
Cricut Wall Art - Bless This Home - Cutting Vinyl


Playing with my beloved Cricut, 
I made this fun little vinyl sign
the other day.


simple Bless This Home vinyl sign


I had cut out this phrase some time
ago when the Cricut Craftroom had
it for free. (It's now available HERE
for $1.99)

The three boards were cut at 3.5"x12.5"
then glued and stapled together.
After my acrylic paint dried, I placed
the vinyl and made sure there were 
no air bubbles. 

The vinyl on the paint is "moveable"
at this point using transfer paper if
you need to adjust it but be careful.

I then painted a thin coat of Mod Podge
over it, left it dry overnight and wrapped
the cord around three times. The cord
is knotted in the back and stapled down.


Note: 
when cutting vinyl on your Cricut,
your blade should be at 3 and the 
pressure at medium.
(I used my Cricut Expression)

simple Bless This Home vinyl wall art


Do you use an
electronic cutting machine
for you DIY projects?


scroll down to see where I'll be sharing today's post.

Apr 26, 2016

A Rubber Ducky Baby card - Cricut Craft Room

My Doodlebug Designs papers are at it again.
I shared a CAS baby card the other week and
here's the second one in my "baby series!"


baby card using a Cricut die cut duck


This sweet little rubber ducky die cut was made
using my beloved Cricut and a free cart from
the Cricut Craft Room.  


baby card using the free software from Cricut
Cricut Craft Room basics, Cricut, Inkadinkado sentiment stamp,
Doodlebug Designs paper (Snips & Snails),
kraft cardstock, flower button, jute twine


The rubber ducky song kept going through my
head as I was making this card.
Rubber Ducky you're the one,
you make bath time lots of fun...


Congratulations baby card, with Doodlebug Designs paper, Inkadinkado stamps


I hope this post brought a little smile to your face!
Thanks for stopping by, enjoy your day!


This baby card series will 
continue in the coming weeks. (:

Follow on Bloglovin


If you own a Cricut,
have you ever used the free
online Cricut Craft Room?


scroll down to see where I'll be sharing today's post.

Apr 13, 2016

A Clean and Simple Doodlebug Baby

CAS baby card, Doodlebug Designs, MFT

A CAS baby card

The end of the world is NOT near!
I just thought I would put that out there today.

How do I know?

Because of the un-naturally high number
of babies being born over the next few
months to friends & loved ones!

With all that new freshness coming into our
world...the world can't possibly be near it's end!


CAS baby card made with Cricut, Doodlebug Designs paper, My Favorite Things stamps
Cricut Craft Room basics, Cricut, Memento ink,
Doodlebug Designs paper (Snips & Snails),
My Favorite Things (DC stamps: notched tags)


CAS (clean and simple) cards are 
definitely my go-to approach to
cardmaking, it fits nicely with
my minimalistic lifestyle!


Doodlebug Designs: Snips & Snails paper 
was perfect for all the baby boys cards I 
crafted; love this monkey print!

Then I used my beloved Cricut and the 
Cricut Craft Room basics cart, available
for free online, to cut my little onesies.

This design would be great for mass 
production but I wanted to get a bit 
creative with each of the cards I made.

Stay tuned for a "series" of baby cards
over the next few weeks!

Thanks for stopping by, have a blessed day!


Follow on Bloglovin


scroll down to see where I'll be sharing today's post.

Jul 28, 2015

HELLO SUNSHINE simple DIY wall art


Hello Sunshine simple DIY wall art using your Cricut


"Some days you just have to create 
your own sunshine!" 


This little gem hangs in the kid's bathroom 
to bring a wee smile each morning.


Hello Sunshine simple DIY wall art


Hubby made this 5x5 inch wooden base 
with a lip to frame my little creation. The 
design paper was cut to size for the background. 
I used my Cricut (electric die-cutting machine) 
to cut out my sunshine image, stamped the 
sentiment and hung it on the wall!

You could easily use a piece of scrap wood 
or a store bought canvas to make this project, too. 


Cricut - Accent Essentials cart.
Joy's Life stamps (Pun in the Sun)
My Mind's Eye Citron background paper & yellow scraps
Mod Podge,  adhesive & Memento ink (embossed)


This is such an easy art concept, think 
of the possibilities for creating 
coordinated decor for your home.


note: 
My project was photographed before 
giving it a final top coat seal with 
Mod Podge; resulting in a better 
photo without glare.


Do you enjoy creating 
your own home decor?


Want to see more of my
DIY projects?

Follow on Bloglovin
or click the
"Let's Connect"
tab at the top of
the page for more
options.


scroll down to see where I'll be sharing today's post.

Jun 25, 2015

Cricut gift bag - a pretty way to present a gift card


I'm always looking for different ways to present 
gift cards; fun, pretty, unique designs.

Today I  have a pretty one to share. 
A wee gift bag created with my beloved Cricut.

Cricut gift bag - Happiness Always, Stampin' Up
Cricut gift bag with note card

I always stamp on scrap paper first to "test" the stamp. 
Here, my test came out so well that I used it to create 
a little note card.


Cricut gift bag with note card - Happiness Always, Stampin' Up
Stampin' Up:  cardstock, stamps (Happy Harmony, rt.) and markers.
blue textured paper (unknown), Memento black ink, button recycled from my button jar.


My custom-sized labels were made in the Cricut Craft Room 
using the free basic software.
Creating labels with the Cricut Craft Room software
online Cricut Craft Room screen shot


What's your favorite way
to present gift cards?


Follow on Bloglovin


scroll down to see where I'll be sharing today's post.

May 18, 2015

The Five Days of Spring - DIY Cleaners


Did I miss spring cleaning time? (I hope, I hope, I hope)
We just cleaned out the last of the ashes from our wood-burning stove. 
And, after this past weekend, my shoulders are sun-scorched. 
I'm sooo confused!

The definition of Spring

Spring: n.noun,the five days 
between the bone-chilling cold 
of winter and the sweltering heat 
of summer.


Got it!


Easy Household Cleaning Recipes


Here are the recipes I use to make my own household cleaners.

For my everyday cleaner, I purchased a heavy duty spray bottle from a local restaurant store. The others are from the Dollar Store.


This has been my only glass cleaner since 1989! 
Works perfectly!

DIY glass cleaner ~

2 Tbsp ammonia
1 tsp. dish detergent
1 pint rubbing alcohol
4 drops of blue food coloring (optional)
1 gallon hot water

Combine ingredients.
Fill a spray bottle & label.


However, if you would rather not use ammonia, here's an alternative that works just fine.

Combine 1 cup water with ¼ cup white distilled vinegar, 
add a few drops of blue food coloring to distinguish it as
a glass cleaner, if you wish. Fill a spray bottle & label.


DIY disinfectant cleaner ~


½ cup white distilled vinegar

2  cups hot water
10 drops tea tree oil (melaleuca oil)
1 teaspoon washing soda (optional)

Combine ingredients.
Fill spray bottle & label.


DIY degreaser ~


2 cups water

¼ cup oil based soap (Murphy's Oil Soap)
10 drops of your favorite essential oil

Mix well, fill a spray bottle & label.

to use: Shake, Spray and wipe with 
a damp cloth. 


Concerned about the safety of  Murphy's Oil Soap, 
check the Good Guide.


And finally, my everyday cleaner...


DIY all-purpose cleaner ~


2 cups water

2 Tablespoons dish-washing liquid

Combine, fill spray bottle & label.

Use whichever dish-washing liquid 
you normally use for hand washing
your dishes. 


Labels.
Using my Cricut & the free Cricut Craft Room software, I made these cute labels but in the end, I just popped the letters on instead. 


Do you make your own
household cleaning products?

Do you have a great recipe 
you would like to share?


Follow on Bloglovin
♥ Follow Me On Bloglovin'

Feb 27, 2014

What I Did on My Winter Vacation...


Hello again everyone!
I'm slowly peeking out from my cozy winter hibernation.
I have been enjoying a bit of a winter break from blogging. 

snow storm, Feb 2014

Hubby & I were determined to declutter 
our home after the holidays and we've 
have been on quite a roll! not done yet!

We have also been continuing on our 
remodeling & redecorating projects.

My kitchen has gone from beige & dark oak 
to cream & mint green, inspired by this...

Kitchenaid Artisan stand mixer, Pistachio


Our master bedroom bath from 
sunshine yellow & oak to crisp 
white & BRIGHT firecracker orange, 
inspired by this...
oriental poppy

too fun!

My daughter & I have become 
cooking show wannabes. 
Trying a dozen or more new recipes 
and buying new kitchen gadgets like 
we see Rachel Ray or Ree Drummond 
use in their kitchens.

that's been really fun too!

I've been Cricut crafting & homeschool planning, 
so I should have much to share with you soon.  

After being away from the computer/blog 
for awhile, I'm finding it hard to set time 
aside to start writing posts again.  
I'm sure I'll get back in the swing of it all soon.


snow covered trees, Feb 2014

Blessings to All!


Follow on Bloglovin
♥ Follow Me On Bloglovin'


Dec 8, 2013

A Hershey's Christmas - stocking stuffers

Hugs & Kisses


Here's a cute treat to make for a stocking stuffer or as a dinner table favor! (I haven't decided yet.)

I started with a clear acetate pillow box, you can find them @ Joy's Life, under the tab "craft containers." You can purchase a 5 pack for only $3.99!

Then fill 'em up with your favorite Christmas candy.

Hershey's Christmas Hugs

To embellish, I created a belly ban using Stampin' Up designer papers, Jolly Holiday.


The circles were cut on my Cricut using the Accent Essentials cart. <Accent6s> page 37 for the scallop & <Accnt1s> for the solid circles in varying sizes, 2" & 1¾".

"Hugs & Kisses" is a Joy's Life stamp from my favorite set  Wintery Puns.

This is a super easy & fast way to add a special touch to your place setting or fill a stocking!


Merry Christmas!


Follow on Bloglovin
♥ Follow Me On Bloglovin'


This post was written while designing for Joy's Life.


Dec 2, 2013

Cricut Christmas Wall Art -Visions of Sugarplums-Day 1

From Cricut card to wall art!


The Cricut Craft Room has been generously 
supplying free Christmas cards cuts for their 
users.  When I saw this particular one, I knew
I had to create a wall sign for my foyer.


I liked how they hyphenated the word Christmas,
'highlighting' the word Christ...
the reason for the season!


In the Cricut Craft Room, I enlarged the Christmas card to 
fit my 12 x 12 mat, then cut and used it as a stencil. I measured the area of the stencil I wanted to use and found a piece of scrap wood from hubby's shop and sanded the edges.  I 'pounced' some acrylic paint on it with a contrasting color and that was it.  
Fast, easy & fun!


If you have an electronic cutting machine,
do you use it to create home decor?

Follow on Bloglovin
♥ Follow Me On Bloglovin'


This post is part of a wonderful blog event
hosted by Lori from Choux Choux Paper Art.
Please pop over to her blog for all the details
and be sure to leave comments along the 
blog hop trail to have a chance to win some
awesome prizes daily!

Your next hop stop is Sandy! 

Full blog hop list & prizes for
Monday, Dec. 2nd:


Giveaways:   

$20 gift certificate  - Nicecrane Designs - http://www.nicecranedesigns.com  
                    
1 set of choice -  Moonlighting by Mary - http://www.etsy.com/shop/MoonlightingByMary
                    
$10.00 gift certificate - Paper Sweeties - http://www.papersweeties.com/
                    
1 set of choice -  Springhill Graphics - https://www.etsy.com/shop/SpringHillGraphics