Showing posts with label DIY. Show all posts

Aug 9, 2016

DIY Notepad Cover - Recycle, Reduce, Repurpose


I am definitely a "SHE" - 
Sidetracked Home Executive (via Flylady)!
Stationery supplies make my heart happy; 
notebooks, journals, papers, pens, markers, 
file folders, planners, etc.

So when hubby & I went to some local 
yard sales this past weekend and I saw 
a fellow "SHE" selling a portion of her 
stash, I was like...


Then during a little crafty time, 
I created a pretty cover for one
of the notepads I had picked up.


These lovely papers are from Echo Park,
For the Record, they were in my scrap
box along with their stickers & trim.

However, the scraps weren't quite wide
enough to cover my pad so I pieced some
together. It worked out perfectly with a
little washi tape to hide things inside! (:


I even found a little 
resin flower to match!


I now have a pretty covered 
notepad for my purse...


I like when everything coordinates!!


check out the one
I created for my


Are you a SHE?


scroll down to see where I'll be sharing today's post.

Aug 2, 2016

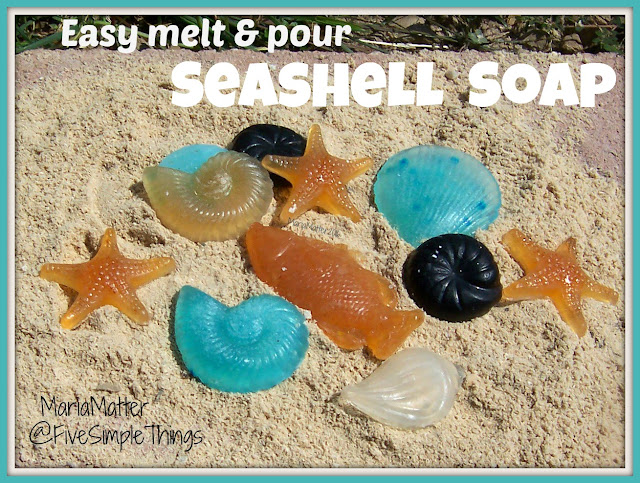
Easy Melt & Pour Seashell Soaps


Ah, summertime...
sun, sand, beach, seashells...seashell soap! 

Why not!

It's a fun activity to do with the kids!


You'll need a melt & pour glycerin bar
and some seashell candy or soap molds
from your favorite craft store.

Then cut a few cubes from the bar and place
them in a glass bowl for melting.

Pop it in the microwave and heat it
for 30 seconds, stir. Continue heating
it at 30 sec. intervals until melted and
its easy to stir.

Separate the melted soap into different
glass bowls if you want to add color to
your soaps.

Once colored, you'll simply pour it into
your molds and let it sit overnight until
firm.

Then pop them out of the molds to use
or give as gifts.

Simple, huh?!

fish, seashell, starfish homemade soap


We used food to color our soaps;
brown sugar, paprika, dark cocoa and 
blue "Jello" powder.


Think of the possibilities...
depending on the molds and colors
you use; you can coordinate seasons,
holidays, sports, special events, etc.


side notes:
if you notice bubbles in your melted
glycerin soap-and they bother you-
you can put a little rubbing alcohol
in a spray bottle and lightly spray the
surface of the soap, the bubbles will
dissipate. 

Also, if you have older kids, this could be
a great fundraiser project. I've given
you the basic instructions, but you 
could get a little more involved by
purchasing soap fragrance and color
gels (a little goes a LONG way!) It can become 
rather addictive, be warned!

make custom made soap


Have you ever made
your own soap?


scroll down to see where I'll be sharing today's post.

Jul 19, 2016

Simple, Sparkly and Recycled - Birthday Card


Recycle, ReUse old cards, cardmaking


A few months ago, my son
received this cute birthday 
card below.

It was bright, fun and sparkly.

And honestly, it was the sparkly
parts that saved this card from
the bin when he was finished with it.


So, with a piece of white cardstock
and a trimmer, a new birthday card
was born. Simple, huh?!


Can you see the sparkly glittery parts???  
Oh my heart be still! (: 


Recycling cards, Happy Birthday
white cardstock, personal trimmer, foam dots


"So that which is old becomes new."

Works great for Christmas cards too!
Enjoy your day!


What do you do with
your old birthday cards?


scroll down to see where I'll be sharing today's post.

Jul 13, 2016

my "But for the Grace of God" bench - Home Decor


Quite a few years ago, my eldest son 
(with a wee bit of help from my carpenter husband) 
made me a lovely bench for Christmas.

He left it unfinished so I could 
paint it to match where ever I 
wanted to use it...so sweet.


It's a beautiful bench, buttery smooth
and I debated whether to just leave it
as is.

Then I was inspired...

Keith Urban 2016
by a Keith Urban song, 
It was a #1 hit back in 2001
but it's one of my favorites
from him.


I originally used my Cricut to 
cut out a stencil but had major
issues with placement and paint
getting underneath it...what a mess.

So I pretty much free-handed it.
Sketching the letters with pencil,
painting with acrylic then using a 
sharpie marker to even out where 
my hand was unsteady. whew!


Determination always succeeds!


Hope you're having a great day.
Blessings!


scroll down to see where I'll be sharing today's post.

Jul 5, 2016

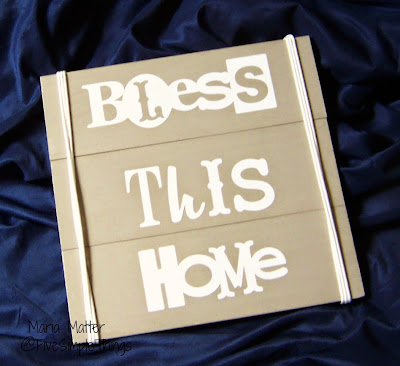
Cricut Wall Art - Bless This Home - Cutting Vinyl


Playing with my beloved Cricut, 
I made this fun little vinyl sign
the other day.


simple Bless This Home vinyl sign


I had cut out this phrase some time
ago when the Cricut Craftroom had
it for free. (It's now available HERE
for $1.99)

The three boards were cut at 3.5"x12.5"
then glued and stapled together.
After my acrylic paint dried, I placed
the vinyl and made sure there were 
no air bubbles. 

The vinyl on the paint is "moveable"
at this point using transfer paper if
you need to adjust it but be careful.

I then painted a thin coat of Mod Podge
over it, left it dry overnight and wrapped
the cord around three times. The cord
is knotted in the back and stapled down.


Note: 
when cutting vinyl on your Cricut,
your blade should be at 3 and the 
pressure at medium.
(I used my Cricut Expression)

simple Bless This Home vinyl wall art


Do you use an
electronic cutting machine
for you DIY projects?


scroll down to see where I'll be sharing today's post.