#wordlesswednesday
Showing posts with label The Garden. Show all posts
Showing posts with label The Garden. Show all posts
May 30, 2018
Sep 13, 2016
Preserving Fresh Lettuce - Salad from a jar
I'm a salad-lover!
I could eat a salad every day,
and I usually do.
Yet I'm always throwing away
lettuce that has turned brown or wilted.
note: I don't actually throw it in
the trash bin, it goes to the chickens/compost.
Well, no more!!
(cue dramatic "ta-da"music here)
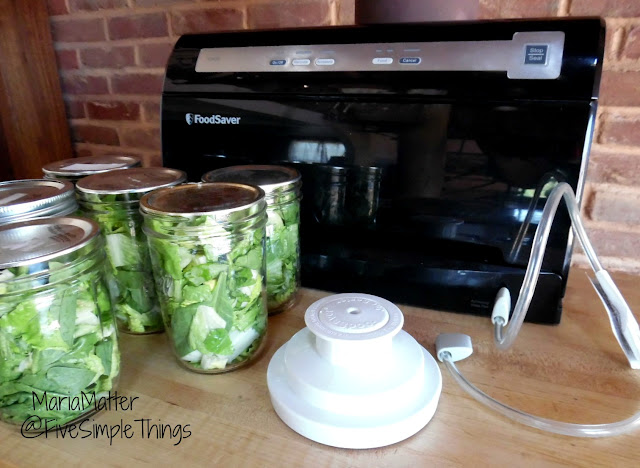
I now preserve my lettuce in canning jars
with my handy dandy FoodSaver vacuum sealer.
We purchased jar sealers for both regular
and wide-mouth. These use the accessory
hose that comes with most FoodSaver models.
Here's how we do it!
We use a mix of lettuce, whatever
we're growing along with store-
bought.
1. Chop it into bite-size pieces.
2. Wash and DRY it really well
in your salad spinner or with
paper towels.
3. Pack your mix of lettuce into
mason jars. Push in as much
as you can!
4. Place a lid* on the jar.
5. Place the jar sealer over the lid.
6. Attach the hose to both the jar
sealer and your machine, hit
the vacuum button.
7. When it is finished, DETACH
the HOSE from the jar sealer
first. You should hear a ping.
8. Then remove the jar sealer from
your mason jar. Test the lid to make
sure its sealed!
9. Keep your jars in the refrigerator
for up to seven days.
That's it.
* you can use new lids (and still use them for canning later) or
you can reuse old lids as long as they aren't too banged up.
Also, this works for quart or pint jars.
I use a pint because that is a perfect serving size for me.
We have been doing this for well over a year now.
You can experiment with different lettuce. More delicate leaves/spinach, I know just starts to turn by the seventh day. However, more sturdy leaves such as romaine will last longer.
This is a huge time saver during the week. For lunch, I simply
grab a jar, empty it onto my plate throw on a few toppings and
I'm good to go!
I have a friend that takes a jar with her to work each day, she puts
her toppings in another container; grabs both on her way out the
door.
I'm all about prepping for one day,
so I can eat for a week.
Do you have any prepping shortcuts
to share??
Aug 30, 2016
Easy Zucchini Cake with Cream Cheese Frosting - Printable Recipe
stockpiles of shredded zucchini!
So, this week, I wanted to share one
of my favorite recipes to make with
that shredded goodness!
Easy Zucchini Cake
with Cream Cheese Frosting
2½ cups all purpose flour
2 cups sugar
1½ teaspoons ground cinnamon
1 teaspoon salt
½ teaspoon baking powder
½ teaspoon baking soda
1 cup vegetable oil
4 eggs
2 cups zucchini, shredded
½ cup walnuts, chopped (optional)
directions:
1. Combine flour, sugar, cinnamon, salt, baking powder & baking soda in mixing bowl
2. Combine oil & eggs; add to dry ingredients, mix well
3. Add zucchini; stir until thoroughly combined.
4. Fold in walnuts, if desired.
5. Pour batter into 13 in. x 9 in. x 2 in. baking pan.
Bake @ 350° for 35-40 minutes.
~Maria Matter http://asimplefive.blogspot.com/
Frosting
4 ounces unsalted butter, softened
4 ounces cream cheese, softened
2 cups powdered sugar
1 teaspoon vanilla extract
directions:
In a large bowl, beat together the butter and cream cheese with an electric mixer. With the mixer on low speed, add the powdered sugar a cup at a time until smooth and creamy. Beat in vanilla extract.
note:
If you're using your frozen shredded zucchini,
there may be quite a bit of liquid in the freezer bag
after thawing.
DO NOT DRAIN! The zucchini "juice" helps keep
this cake super moist!
Check out some of my other
Zucchini recipes and ideas.
My pickiest eater actually requests
this recipe for his official birthday cake!
Yea, it's that good!!
I hope you'll give it a try (:
Have a blessed day!
scroll down to see where I'll be sharing today's post.
Aug 23, 2016
Preserving Your Summer Squash - Zucchini
If you're someone who likes
to share, grow summer squash.
It's a very prolific plant!
We grew green & golden
zucchini summer squash
this season.
Unfortunately, we started
our garden a bit late due
to our May/June vacation
this year and it was just
when the squash "moths"
were laying their eggs.
We didn't notice in time,
and their larvae feasted
on our plants!
#sadface :(
We were able to pick a few before
the vines started dying off.
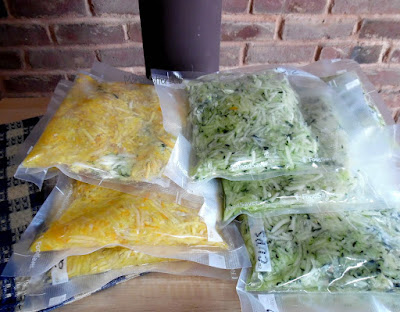
Most of my zucchini is shredded,
preserved in FoodSaver bags and
stacked in the freezer for later use.
Although you can add shredded
zucchini to a number of recipes
to increase your veggie intake,
our main uses are...
*Zucchini Cake with Easy Cream Cheese Icing,
*Zesty Zucchini Relish.
I'll provide links above as I share my recipes here on the
blog in the coming days.
We use a food processor with
a shredder blade.
If you have a shredder for your
Kitchen-Aid mixer great, if not
a hand grater would work too!
Then we bag it up in 2 or 3 cup portions.
3 cups for the bread, 2 cups for the cake
and relish. Freeze it flat then stack it to
save space. No blanching required.
You could also slice your zucchini in
rounds and dehydrate it for use in soups
and casseroles.
Sprinkle on some seasonings before
drying them for variety.
Whether you shred it, freeze it or
dehydrate it, Zucchini is easy to
preserve and a great veggie to keep
on hand.
Now, I'm off to bake a zucchini cake!
Do you grow squash
in your garden?
What is your favorite
way to use it?
scroll down to see where I'll be sharing today's post.
Jun 29, 2016
Road Trip, a New Journal and Coming Soon on Five Simple Things!
Gosh, life gets busy,
days go by and all of a sudden half the year is over.
Stop this crazy, spinning world for a moment,
I need to get off!
 |
| Virginia IS for Lovers! |
So much has happened since I last spoke with you!
We've traveled the highways and by-ways of the U.S.A.
Visited some lovely folk and saw some amazing sites!
 |
| Arizona...but it's a dry heat! |
Then came home to massive gardening chores.
 |
| Daniel built me more garden boxes to fill! |
Planting veggies, herbs, trees and bushes.
We're starting a bit late since we didn't want
to plant everything before we traveled, so
we'll see how it all turns out.
 |
| purchasing trees & bushes at the nursery. |
I also started a new planner system to organize &
journal our exciting life {{grin}}
More on that later.
And
I bought a new faith journal. I have always
just used a plain notebook but during our travels
I came across this lovely little notebook and it
called to me & reminded me that I was on the last
pages of my current journal. kinda.
Isn't it pretty???
Wanna see what my personal faith journal looks like
inside? Stay tuned.
I have some other fun things to share with you now
that I'm back home and settled into my air-conditioned
lair for the summer.
Have a great Wednesday!
May 18, 2016
Super Moist Zucchini Bread - printable recipe
I'm sharing a long-time family
favorite recipe today!
When our garden explodes with
zucchini every summer, I work
feverishly to process it for the
freezer.
Shredding, measuring and bagging
it with my beloved Food Saver!
The uniformly bagged zucchini
occupies a designated corner of
our chest freezer to be used in a
variety of dishes throughout the
year!
 |
| zucchini bread |
Adding shredded zucchini to recipes
is a great way to increase your veggie
consumption as it doesn't have a
strong individual flavor.
However, there are two main recipes
in our home that quickly deplete my
pretty little frozen piles; this super
moist zucchini bread and our rather
sassy zucchini relish.
Both are well loved by adults, children
and assorted family & friends!
Today, I'll share our bread recipe...
Zucchini Bread
3 eggs
2 cups sugar
1 cup oil
3 cups zucchini, shredded
3 teaspoons vanilla extract
3 cups flour
1 teaspoon salt
1 teaspoon baking Soda
¼ teaspoon baking Powder
3 teaspoon cinnamon
1 cup raisins (optional)
1. Preheat oven 350 degrees (Fahrenheit)
2. Beat eggs until foamy
3. Add sugar, mix well
4. Add remaining ingredients, mix well.
Grease & flour 8-9 mini loaf pans, fill half full.
Bake @ 350° for 40-50 minutes.
~Maria Matter http://asimplefive.blogspot.com/

So delicious!
Be sure to pin it for this summer's
zucchini harvest!
Are you a
Zucchini lover?
scroll down to see where I'll be sharing today's post.
May 22, 2015
From Cookies to Muddy Boots - DIY Drying Rack
My "About Me" page claims that I re-cycle,
up-cycle and repurpose for the sheer joy of it.
Here's my latest joy...
We've all seen the boot drying racks with
pretty stones, rocks or pebbles in a pan on
Pinterest, right?
So pretty, yes, however, every time you want
to clean out all the accumulated mud & dirt you
have to dump out all the stones, wash them and
let them dry a bit before putting them back in the pan.
Not very practical for this country girl.

I needed something I could rinse off easily
with my hose and put back in place before
the muddy boots started arriving again!
So here's my solution; old cookie sheet,
cooling rack and pretty spray paint.
The cooling rack is easy to rinse & dry and
allows maximum air flow for muddy/wet boots.
Honestly, I did not over think this too much,
so it was a really quick project.
I did not "prepare" the baking sheets in any way
prior to painting. We've been using them now for
over two months. Works perfectly!
Have you used the pebble/stone drying racks?
Do they work for your family?
scroll down to see where I'll be sharing today's post.
Nov 17, 2014
Homemade Spaghetti Sauce - printable recipe
We've been making spaghetti
sauce over the last few days.
It's SO good!
I know this is normally a summer activity
for most gardeners, but cooking & canning
all day doesn't appeal to me while I'm melting
in the warmer weather. So I throw all my
tomatoes in the freezer and wait for 'wood stove'
cooking season.
With the latest cold front bringing in this chilly
weather, mid-November, it appears the season
has arrived!
Homemade Spaghetti Sauce
½ bushel of tomatoes (more or less)
½ cup olive oil
6 - 8 garlic cloves, minced
1 Tablespoon salt
pinch of black pepper
8 - 10 ounces tomato paste
¼ - ½ cup sugar
¼ cup oregano
¼ cup parsley
¼ cup basil
1 cup zucchini, shredded (optional)
1. peel tomatoes
2. puree tomatoes in blender/food processor
for a thinner sauce
OR mash them if you like a chunky sauce.
3. In a large pot (at least 10 quart) cook garlic in oil.
4. when garlic is tender, add tomatoes and
remaining ingredients.
5. IMPORTANT- taste periodically.
6. Boil until sauce cooks down to desired thickness.
notes:
1. Paste tomatoes such as Roma or Amish have higher
levels of sugar and acids along with less moisture,
making them a better tomato to "cook down" than other
tomatoes. They are sometimes called sauce tomatoes.
If using only sauce tomatoes, start with less sugar
than listed above.
Personally, I use whatever tomatoes I have on hand,
(Roma, Amish, Beefsteak, even Large Red Cherry) and
just adjust the seasonings as they're cooking.
2. To easily peel tomatoes, dip in boiling water for
about 30 seconds or until skins begin to crack.
This is the personal recipe of Maria Matter @ Five Simple Things.
If canning, when your sauce reaches your desired
thickness, pour hot into hot jars, leaving ¼ inch [6mm]
head space. Process pint jars 30 minutes in boiling
water bath.
one more note:
As I mentioned above, I put my fresh tomatoes
in the freezer until I'm ready to process them.
I core them first and cut off any bad spots, then
fill up a freezer bag, removing as much air as
possible.
When you remove them from the freezer, place
them in a colander in the sink. As they start to
thaw, some of the water will drain reducing your
cooking time and the skins will crack on their own
eliminating the need to dip in boiling water. Let
them continue to drain for a while longer after
peeling.
If you've never made your own sauce, I encourage
you to give it a try and I would be happy to answer
any questions you may have.
Enjoy!
scroll down to see where I'll be sharing today's post.
Sep 20, 2014
What to do with Extra Large Turnips - dehydrating turnips
Turnips are certainly a welcome crop in my garden!
However, there are always a few over-achievers in the bunch!
While I prefer the small to medium size turnips for their more mild flavor in many of my recipes, I certainly do not let the larger (less tender) ones go to waste!
I dehydrate my extra large turnips to use in my crockpot soups & stews as they add a nice robust flavor!
If we have a plentiful harvest, I'll store a reasonable amount of fresh turnips for our family and dehydrate the rest.
The dried turnip chips can be eaten as a snack (like potato chips) or crushed to be used in sauces, dips, soups, etc.
Drying turnips.
1. Wash, cut off the tops & root and peel as you would a potato.
2. Slice, as thin as you can.
I used this mandolin slicer we found @ Walmart for $10.
 |
| Mainstays multi produce slicer |
3. Blanch your slices in boiling water for 3 minutes, then plunge into icy cold water to stop the cooking process.
4. Spread out turnip slices & towel dry.
5. The slices are now ready to be dehydrated using your preferred method.
I use 2 fan-less Ronco dehydrators.
We purchased one 20 years ago &
another at a yard sale for $3. this past spring.
6. Store in an airtight container.
As a fun option, try sprinkling your favorite spices on the turnips slices before starting the drying process! I use cayenne pepper.
Do you grow turnips in your garden?
How do you keep them over the winter?
| ♥ Follow Me On Bloglovin' |
scroll down to see where I'll be sharing today's post.
Subscribe to:
Posts (Atom)


